|
0. Introduction
Data Logging... a 1950’s sportscar... Top gear... University?! All these seemingly unrelated things have come together for us lucky members of the Oxford Universities Motorsport Foundation over the last 2 months. My last report/update was written just after the Donington Historic Festival where the extremely kind people at Haltech and Race Winning Brands sponsored the team with a Haltech Nexus S2 and the climb up the Data Logging/Race Engineering learning curve began. The push to install sensors and study the produced lines has not slowed any. But I will pick up where we left off and even though this story starts quite similarly to the last one it definitely does not end the same.
0 Comments
After the exciting ‘high’ of getting the V8 engine rebuilt, reinstalled and hearing it fire up for the first time in years, everyone thought we had earned a breather. But in true project car fashion, that moment of triumph was just the beginning of the next wave of work. The first start revealed an engine that was running rough, something that was expected on a freshly rebuilt engine with a new increased airflow intake manifold and a fully stripped down and rebuilt carburettor. The first tweaks involved getting the timing right, so the team cracked on, timing light in one hand and workshop manuals in the other, chasing the sweet spot where the idle would hold steady and the throttle response would come alive. This combined with the fine-tuning of the mixture and idle screws on the carburettor provided a healthy sounding engine ready for its first full heat cycle. As the team found out, getting a newly built engine to behave is not just a technical job. It is part science, part instinct and experience, and in our case, a shared determination not to settle for “good enough”. 1. Acquiring A Data Logger Data Logging has become one of the most important aspects of modern motorsport and being quite keen on becoming a race engineer I thought it was high time to dive into it. Looking around the HQ of the Oxford University Motorsport foundation I saw two primary forms of acquiring data: 1. The Vbox which only outputs video and speed via a gps and 2. A Motec data Logger from 2003 that sadly no longer fully functions. Not letting myself be defeated so soon I went to Ding with my query and he duly reminded me that I may have an opportunity to get a new data logger at the race retro motorsport show. Upon looking at the list of stands at race retro my ambitions to acquire the squiggly lines was re-lit with Haltech being in attendance. At race retro we were met by Martin Stelleman and Mark Luney who both jumped right on board in my quest to learn proper race engineering and graciously allowed OUMF to ‘have a play’ with a Haltech Nexus S2. Not getting too personal, but my excitement was through the roof. 11 analog inputs! 6 SPI’s! A MAP sensor!?!? Once the Haltech (which is what I will refer to the Nexus S2 as from now on) was with us we put it on display at the Practical Classics Restoration Show at the NEC with many ooo’s and aahh's from not only the students in the club but many a show goer. I was just ready to crack on and get the thing into one of our cars! Thanks to Chris Smith at Devon Racing, we were very kindly given some new engine mounts from another TVR, and the engine, with the gearbox, was finally mated with the chassis. Unfortunately, this wasn’t the end of the problems for Gerald. A lot of hard work allowed the engine to be plumbed in and started, after which we quickly realised oil was leaking out the back of the engine through an oil gallery bung that wasn’t properly sealed. We also found the coil would get extremely hot even when the engine wasn’t running, so that needed to be replaced too. The engine had to come out again.
However, every cloud has a silver lining! In every project, there are certain moments that stand out, and we have just hit one of those milestones: the engine is finally installed in the TVR! This marks a pivotal step in bringing our vision for this restored classic to life.
The journey to this point was not without its challenges, as we spent months sourcing the right parts, restoring or modifying every single part, ensuring every detail met our standards for performance and compatibility. The freshly built engine was finally ready to go in, but after careful preparation of the engine bay, our first go at the installation uncovered that the engine mounting brackets were the wrong fit—a frustrating setback. Who are Zircotec?
Zircotec Ltd is a world leader in heat management, specialising in high temperature coatings and heat barrier solutions. Originally part of the UK Atomic Energy Authority, Zircotec’s expertise lies in thermal barrier technologies initially developed for the nuclear industry. Zircotec is known for its plasma-sprayed ceramic coating materials that provide thermal and abrasive resistance. Their core products, such as... Introduction
The headliner, also known as the roof lining, is the fabric panel that spans the interior of the roof above the heads of the occupants, and in the Kestrel’s case, the fabric extends down the B and C pillars to the waistline of the car. It is suspended from 6 arched metal rods that slide into pockets on the upper, roof side of the lining and their ends locate in holes in the cant rails down either side of the inside of the roof. Over time, headliners can sag, tear, rot, become damaged by UV, or stained by tobacco smoke and hair products. The process of replacing the headliner is a painstaking but rewarding process which can greatly improve the overall look and feel of the car. With the average price to install a headlining kit ranging from £250-£500, our aim was to document the entire process so that other enthusiasts might feel confident enough to tackle the replacement and do a professional job, at a fraction of the price. While our headlining is known as a suspended headliner, and this is a report on the fitting of this specific kit, the steps are applicable to many other models and designs.
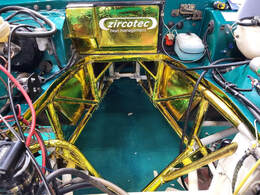
The problem that we had with the 1968 Riley Kestrel project arose only after painting the interior of the shell and then comprehensively lining the floor, doors, and other panels with a sound-deadening product called Kilmat. This is a butyl rubber backed foil, similar to other products like Dynamat, and is a dense, malleable sheet - very like the bitumen panels found on older cars - that absorbs drumming, and drivetrain and road noise very effectively. Once the lengthy process of cutting it to shape, sticking it down, and thoroughly rolling it into place is completed, it is extremely difficult and very messy to remove. The Kestrel came to us following extensive renovation of the floor, including replacement of the sills and much of the floorpan. We stripped the floor inside back to bare metal and it was very sound prior to painting with Rustbuster epoxy mastic , and top coat in body colour. The underside had been finished with a coating of black ‘schutz’ type underseal which was lavishly applied and did not appear to need further attention - all of which gave us the confidence to apply the Kilmat.
It was at this point that two issues arose in quick succession. The first was that we were kindly donated an LCB manifold and pipework by John Ashley Exhausts, and Joe Ellis at BTB Exhausts generously offered to help by undertaking various modifications in the course of making it fit as snugly along the underside of the car as he could. His artistry resulted in there being very little clearance between the stainless steel silencer boxes and the walls of the tunnel - which looked fantastic, but spelled big trouble for the very meltable Kilmat now glued just above it. The second problem was the chance discovery that the schutz underseal had been applied to bare steel – without any signs of... Firstly, I’d like to take a moment to say a big thank you to all of our sponsors and the individuals who made this week possible. Without you, this would not have been feasible and we are all better off for experiencing this opportunity.
Sunday The start of action week began on Sunday the 8th of January. We converged at the barn at 11am to begin preparation in order for the week to run as smoothly as possible. Now I must say we were extremely productive and put our engineering minds to the best of use: we invented crutch cricket and kicked an increasingly muddy football around whilst we waited for Ding to get some PayPal issues sorted out with the help of Bobby Bragg. Whilst our own, slightly disorganised, version of the OUMF Olympics was underway we sporadically packed up Ding’s Volvo with the engine blocks that were going to go through the baths at Lenton Treatments, packed laminates of the sprite and team photos that had been lovingly signed by all the team taking part in Action Week and packed all the teams personal kit. It was a struggle, but somehow we managed to fit all 10 of us into two cars, plus the kit and the engine castings. In Bobby’s car was Marcus Ward, Arran McLuskie, Archie Stewart and myself. In Ding’s car were Seb Paul, Luis Albas, Eddie Scheer and Sean Harvey. Luckily for us, Ollie Raja-Brown would be meeting us at Fuchs Lubricants the following morning so that there would be space for Joe Taylor, and all our kit to be distributed between the three cars. The drive to the Taylors home in Congleton was mostly uneventful though we now have learnt not to trust Bobby’s navigational skills, with him leading us away from the right destination even though everyone in the car saw Ding take the right turning. ‘Surely he’s going the wrong way?’ No, he went the right way, although we did get a more scenic route seeing all that Congleton town had to offer. Roughly 15 minutes behind Ding the second car arrived and we were shown around Joe’s home. A very warm thanks to the generosity of Joe’s parents for letting all of us stay. They kindly put us up in the garage which had been converted into... |
Categories
All
|

